Tag Archives: plan menus

Pork Hash

IMG_2972

This tasty, hearty breakfast is a meal I came up with for our adventure doing the Whole 30 Program. You can read more about my meal plan for Week 1 here. This recipe makes 4 servings and I typically serve it right after I make it on Day 1 and pack it in tupperware so that we can take it to work with us on Day 2, it still tastes great heated up the next day.

Ingredients:
1 lb. organic, grass-fed ground pork
1/2 red onion, diced
2 cloves garlic, minced
1 large potato, cubed
1 tbsp. ghee or clarified butter
1/2 tbsp. fresh sage, chopped
1/2 tbsp. oregano
1/2 tbsp. chili powder
salt & pepper to taste
2 eggs (optional)

In a large skillet, melt the butter over medium heat and add the onions. Sauté for about 10 minutes until soft and slightly browned.

In a separate sauce pan, bring water to a boil and then boil the cubed potatoes for about 7 minutes. Strain and set aside when cooked.

After 10 minutes, add the pork and all of the dried seasonings (everything except sage and garlic) to the skillet with the onions. Break up the meat as you cook it. After the meat is mostly cooked (about 5 minutes) add the garlic and sage and cook for about 3 minutes more.

IMG_2974

Create space in the middle of the skillet by pushing the meat and onions to the sides and add the potatoes in the center of the skillet. Try to get them in a single layer as much as possible, and put everything from the sides of the pan on top of the potatoes and don’t stir at all for a few minutes. This gives the potatoes a chance to get a little bit of a crisp on them.

Mix all ingredients in the skillet together, cook a few more minutes and then serve.  If you don’t eat eggs, you’re done! Enjoy!

Additional options:

Serve with 2 scrambled eggs on top of the hash.

IMG_2975

Or, for what my husband says is the tastiest version of this dish:
Take the portions of the hash that you plan to save for following days and put into separate containers. Pour 2 raw scrambled eggs into the hash and stir and cook until the eggs are cooked through. Serve immediately.


Naked Chicken Chile Rellenos

I’m a Texas girl and when I found out about my allergies, one of the very hardest things to give up was Tex Mex.  No corn, no flour, no cheese, no eggs…at first that all seemed to add up to no Tex Mex and I’m not going to lie, I was pretty upset about it.  Last summer at the farmer’s market I saw some beautiful poblano peppers and decided to fix this gaping hole in my life.  I started experimenting with chile relleno adaptations and this probably took more effort than any other recipe I have come up with, but it was worth it.  This is a work intensive recipe but it isn’t difficult and it freezes really well so make a big batch and save some for another night when dinner will be wonderfully easy to make up for the work you put in on the first round!

photo 1-2

4 poblano peppers
1 chicken breast
1 quart low sodium chicken stock
manchego cheese (sheep’s milk)
1 packet gluten free taco seasoning
olive oil

Set your oven to broil and rub a very light coating of olive oil all over the poblanos.  Place them in a baking dish and broil them for 12-20 minutes, turning every 5 minutes or so, until the skin has charred and bubbled.

While the peppers are in the oven, bring the chicken stock and 1/2 of the taco seasoning to a boil.  Add the chicken breast in the stock and boil for 10 minutes then cover and simmer for 20 more.

photo 2-2

When the skin on the peppers has bubbled and the peppers look like the picture above, peel the waxy skin from the peppers then slit them lengthwise – one side only, leave the pepper intact as much as possible – and scrape the seeds out as well.  Turn the oven to 350 and set the peppers aside on the counter for now.

After 20 minutes of simmering, pull the chicken breast out of the stock and shred it using 2 forks.  Add the shredded chicken back to the stock to soak up the flavor.

photo 3-1

Place the seeded, skinless peppers back in the baking dish and place slices of manchego cheese inside the peppers.  Scoop chicken, with just a little of the stock into each pepper and then add one more small slice of cheese on top of the chicken and pull the sides of the pepper back together.  (Note: If you are going to freeze some, freeze them at this point in the recipe.)

Bake the rellenos at 350 for 20 minutes then enjoy the fruits of your labor!!

photo 4

I pulled the seam apart a little in the final picture so you can see inside them a bit.

Rare Beef Pho (Vietnamese Soup….with an Americanized shortcut)

I love pho.  I mean, I’m a little obsessed with it.  There haven’t been many weeks this year that I haven’t gone out for pho at LEAST once.  I have to admit though, that I am a little intimidated by Asian food when I cook at home.  It is one of the very best cuisines for my allergies, and the type of food I choose almost every time I go out, but somehow I have only ventured to try really basic stir fry at home.  I think it’s that everything is different, the spices, the techniques, the ingredients, and maybe just the fact that I didn’t grow up around anyone that knew how to make it, but I have always been a little afraid to try.

Recently I decided to give it a shot, to try to make pho at home, so I started researching pho recipes and almost gave up on the spot.  To make it authentically takes 1-2 DAYS, involves bone marrow and all kinds of strange ingredients (I refuse to touch bones or eat meat that wasn’t removed from the bone before I laid eyes on it….one of my little quirks), not happening.  So my experiment with an extreme shortcut to pho began and I have to say, it’s pretty darn good.  It has passed the test with a few pho-obsessed friends and I think I’m ready to share.

IMG_1937

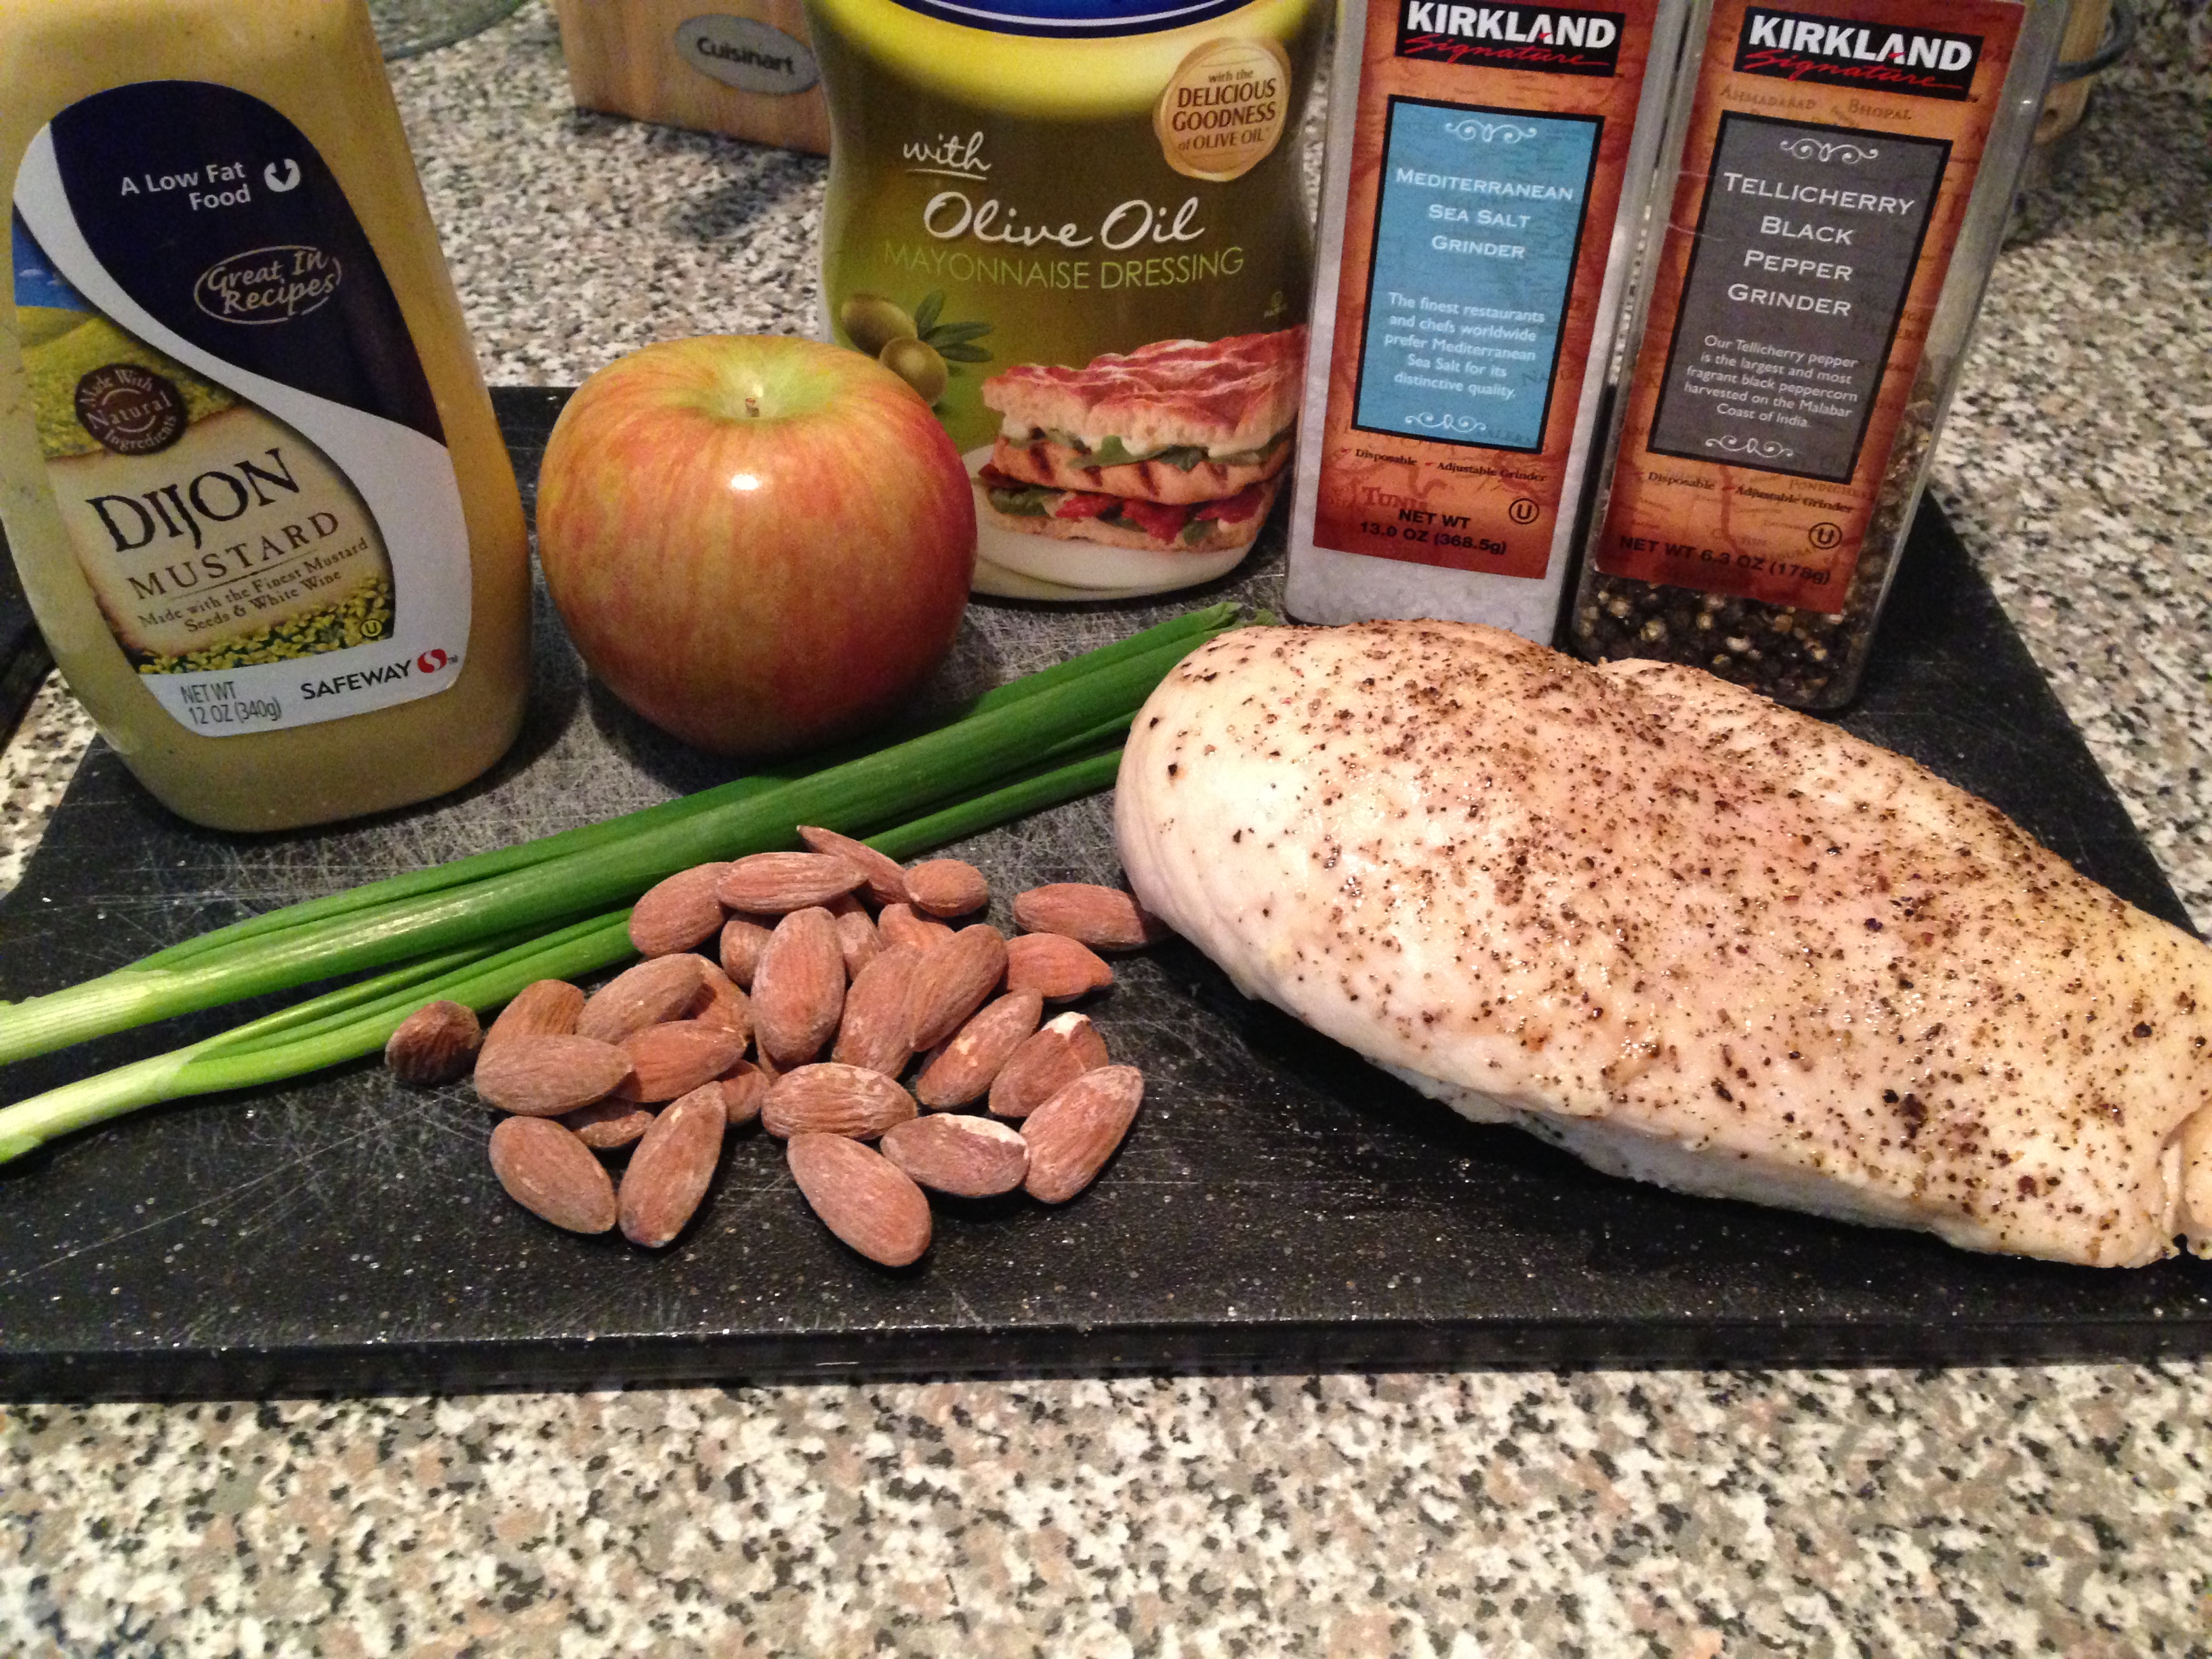
Ingredients, for approx. 3 people:
– 20 oz Organic Gluten-Free Beef Broth
– 32 oz carton of Pacific Brand Organic Beef Pho Broth Soup Starter
– 1/2 tbsp chopped ginger
– 1/2 tbsp chopped garlic
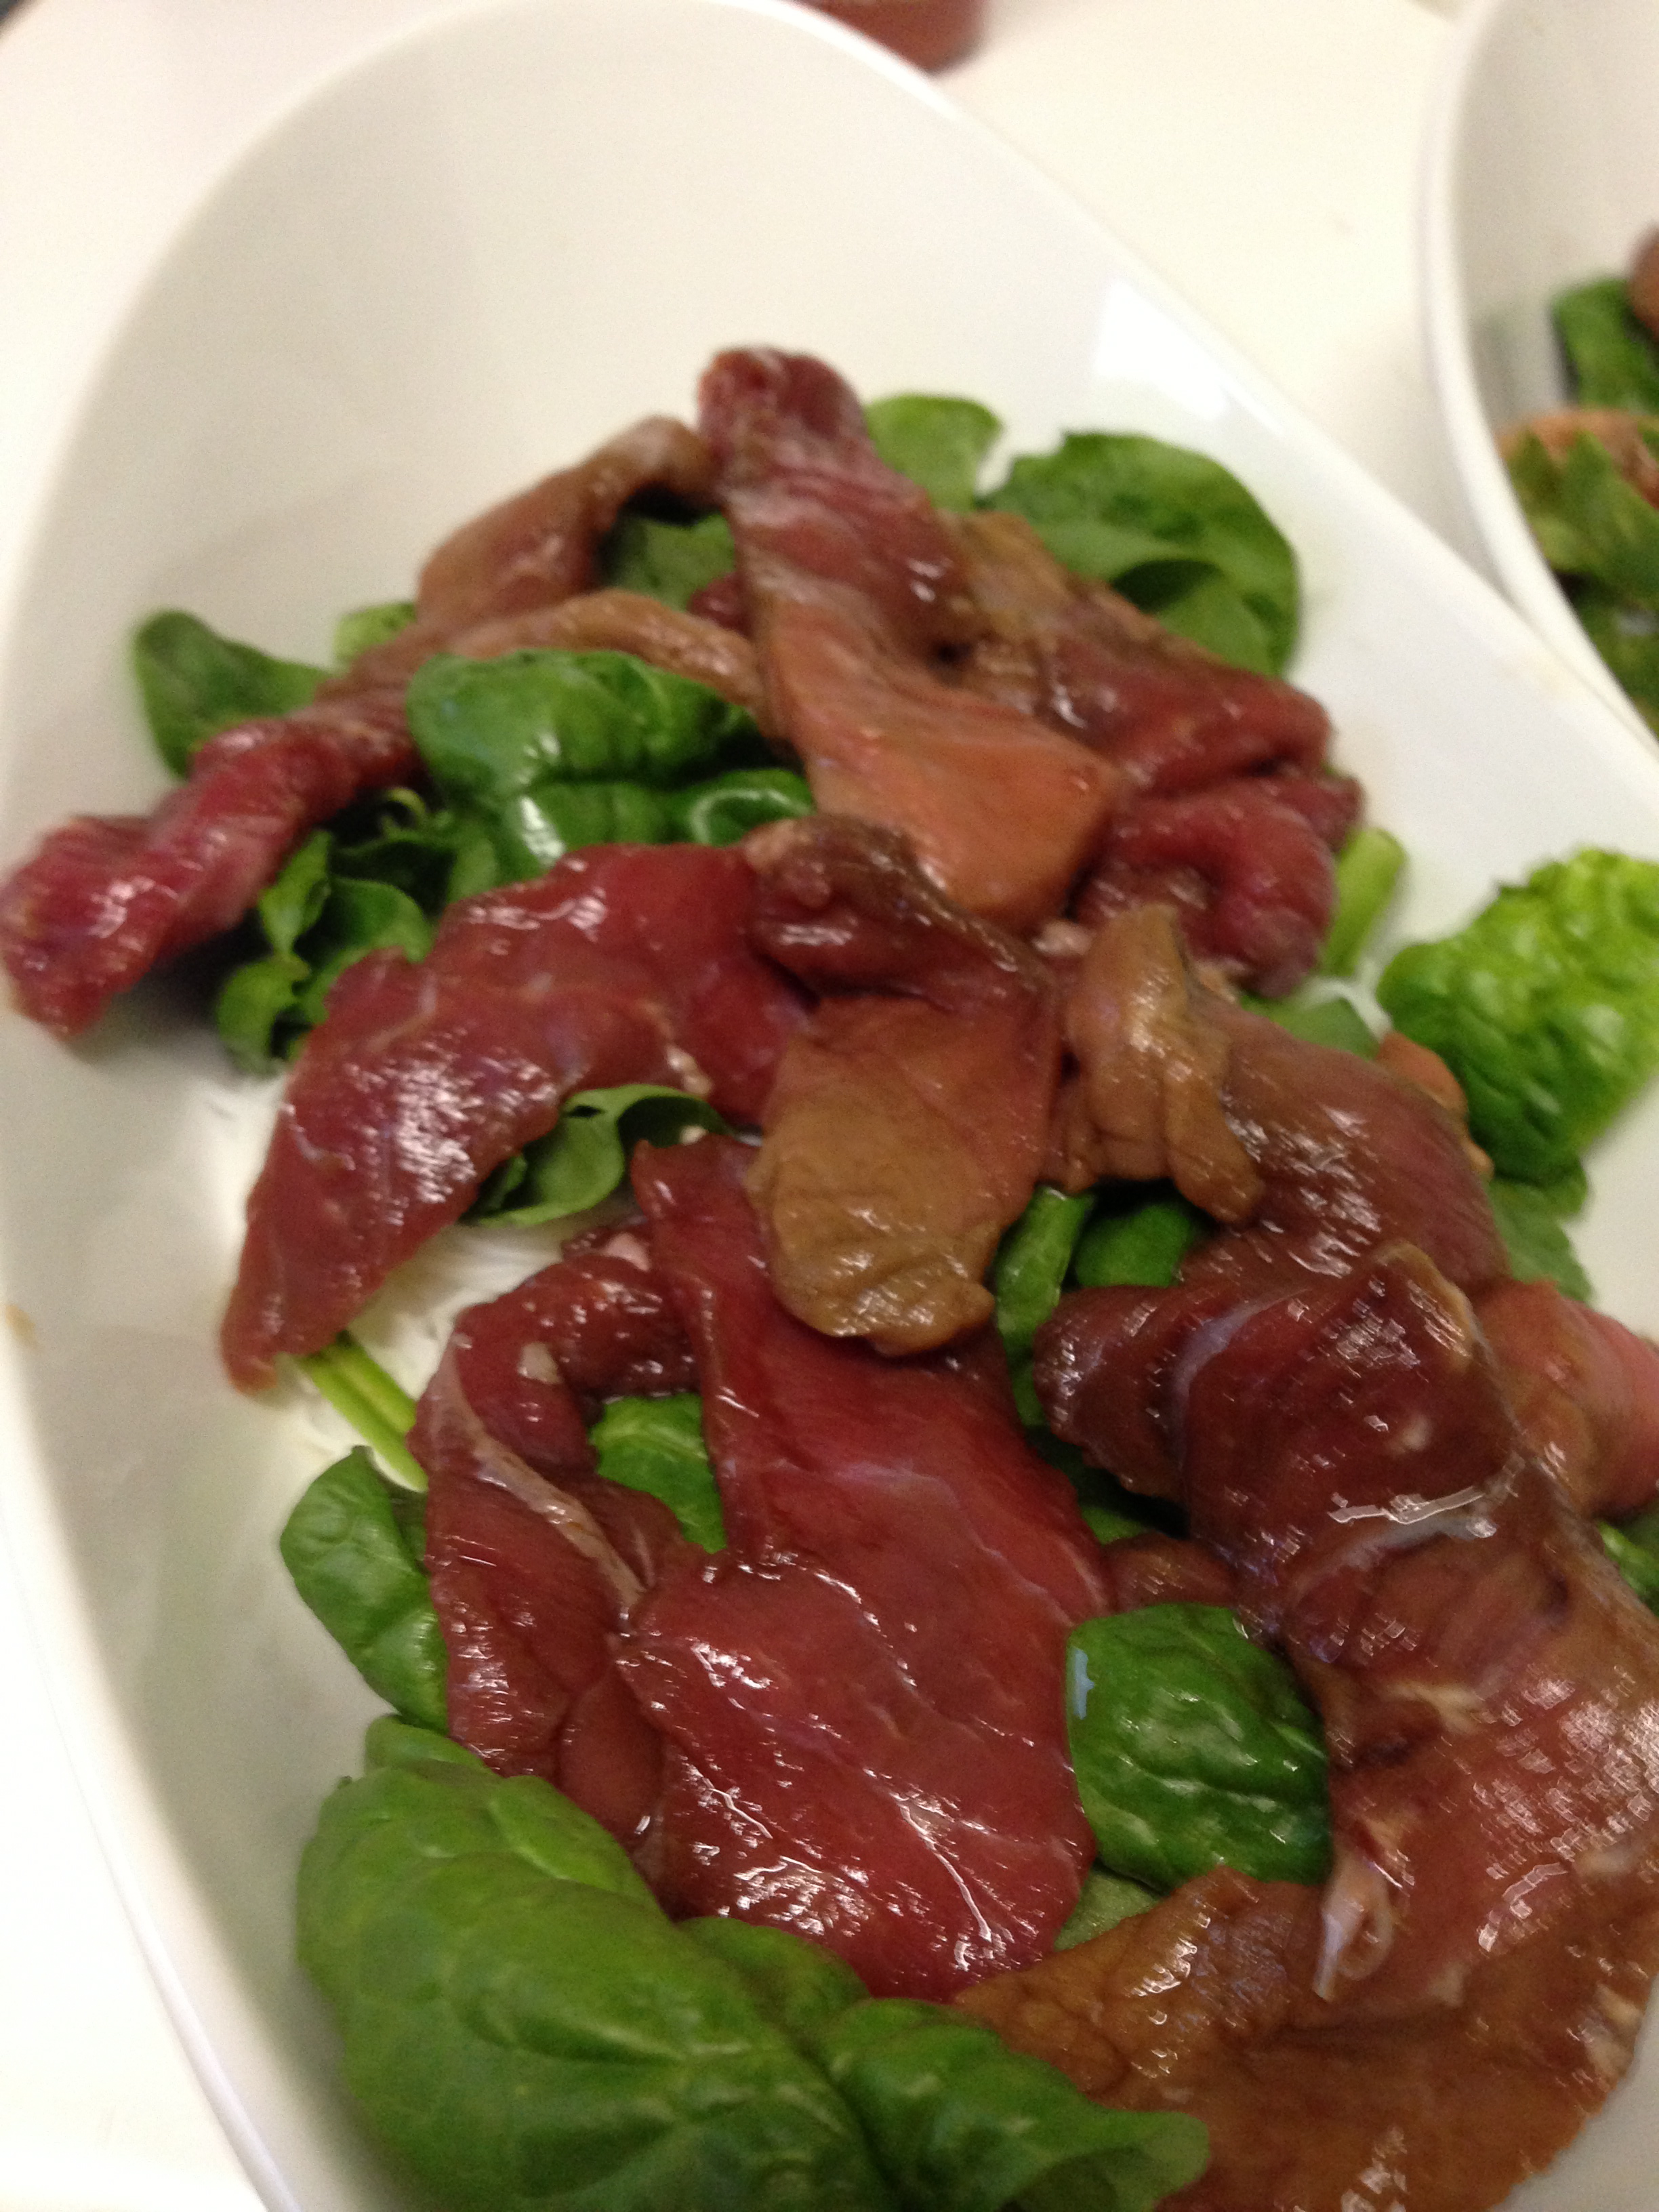
– 8 oz grass-fed organic round steak sliced as thin as possible (I ask the butcher at the store to do this for me)
– 3 whole cloves garlic
– 1-2 tbsp gluten-free soy sauce
– 4 oz rice noodles (either pad thai style or vermicelli style)
– 3 tbsp fish sauce (get an authentic brand (one you can’t read the label of) not Thai Kitchen)
– 1-2 cups fresh spinach
– sriracha sauce to taste

About an hour before you want to eat dinner, put the steak strips, soy sauce and smashed but intact whole garlic cloves in a ziploc bag to marinate.  Every recipe I found had you put the steak in with no seasoning, which is how it is traditionally made.  However, when you aren’t making the authentic broth, the beef is very bland and I have found that this really simple marinade makes a huge difference.

About 30 minutes before dinner, put both types of broth, the chopped ginger, chopped garlic, and fish sauce in a large pot with a lid and bring to a boil.  Boil at a low boil / rolling simmer for about 25 minutes, covered.  Keep an eye on it, it sometimes has a tendency to boil over.  Side note – the reason for the two different broths is this: most recipes for pho call for cinnamon and anise to infuse the broth as well.  I have tried and tried but the flavor of these two is always overwhelming when I use an actual cinnamon stick.  The Pacific pho soup starter has both of these ingredients already in it so that guesswork is taken care of and I mix it with the regular broth so that I can still infuse it with ginger and garlic to my liking.

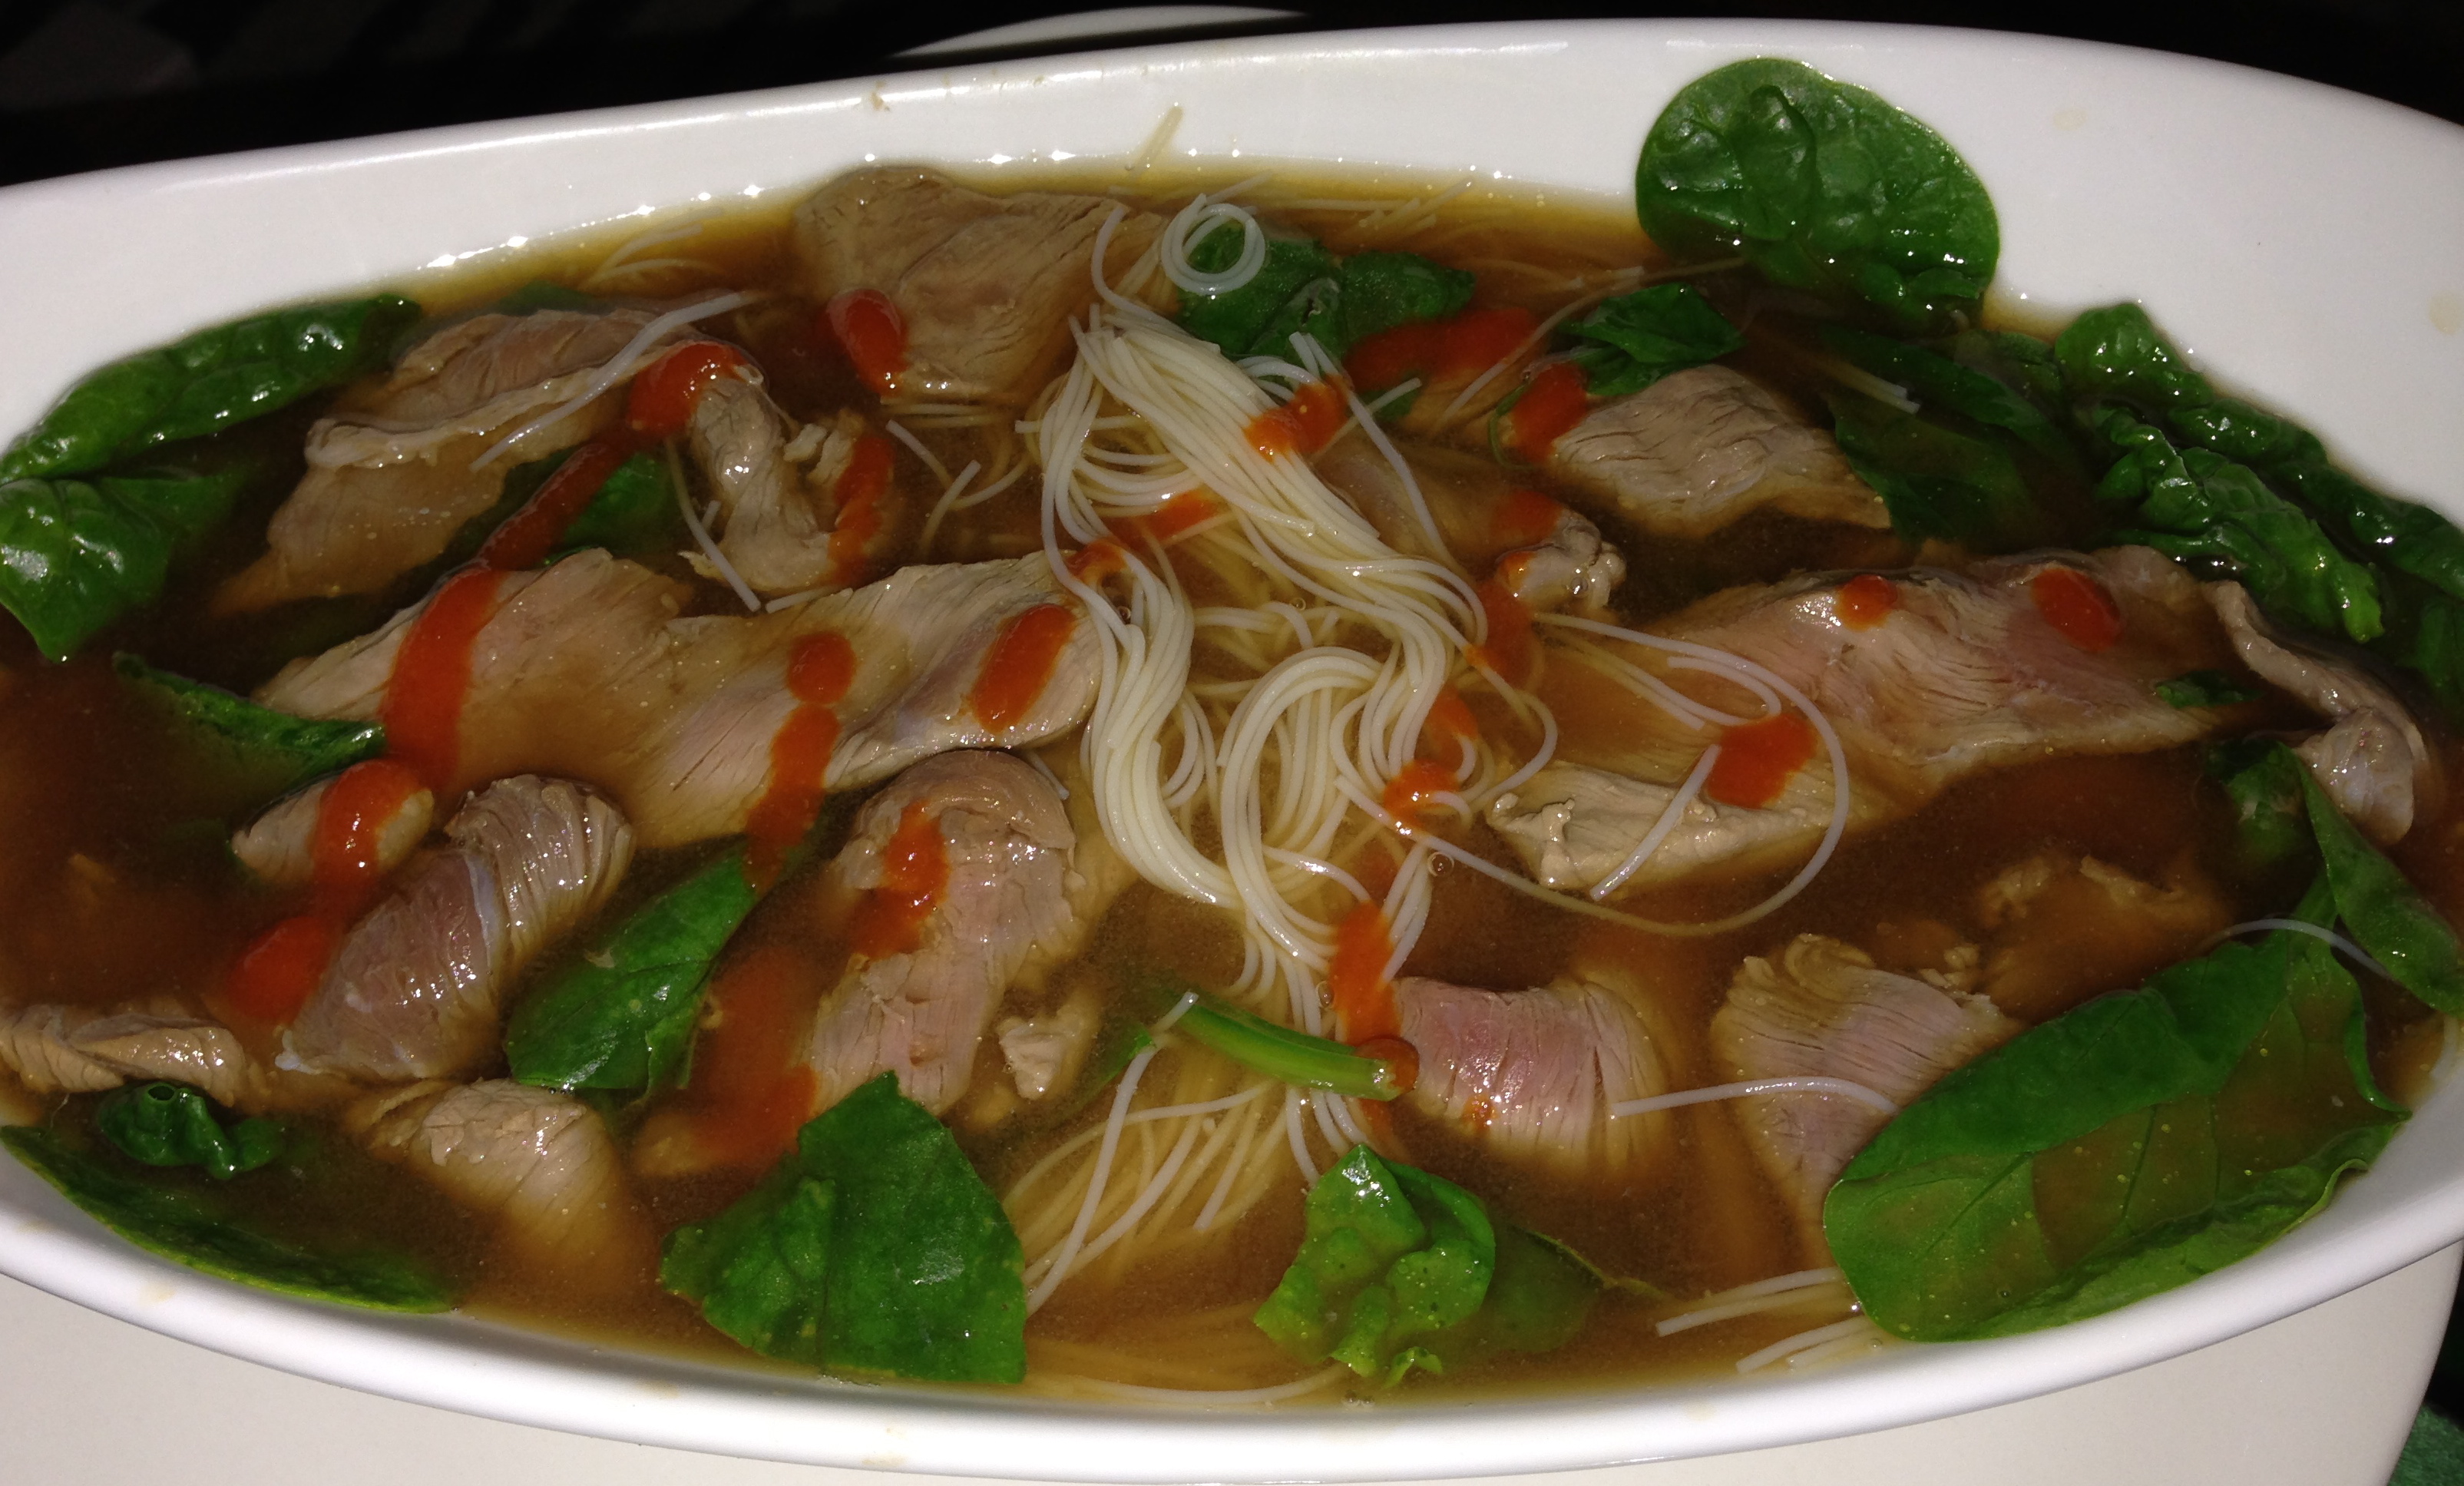
While the broth is simmering, prepare rice noodles according to package directions.  Once cooked, place the noodles in the bottom of the serving bowls.  Place fresh spinach on top of the noodles and place the raw steak (just the steak, not the garlic or soy sauce) evenly spread out over the bowl.  Try not to overlap the steak very much since the broth will actually cook the steak to rare in the bowl and if it is stacked on top of each other, it won’t cook properly.  See picture below.

IMG_1938

After simmering 20 minutes, strain the broth to remove the ginger and garlic pieces and immediately pour the broth in the waiting serving bowls, be sure the broth covers the meat so that it will cook it.  I like to add a little sriracha for some spice, that’s completely up to you though.

IMG_1944

Is it easier than going out for pho?  No.  Is it cheaper?  Honestly, probably not.  But it’s a fun, unique dish to make on your own and the best part is that when I make it at home, I can fully control the ingredients and knowing I’m eating all organic food and that I am not allergic to any ingredients is certainly worth it.  An added bonus: it’s delicious.  Hope you enjoy it too!

Chicken Salad

While I avoid a lot of food because of my allergies, there are 3 foods that I won’t include in recipes because I hate them.  I’m not a picky eater at all but I absolutely will not eat: 1) olives, 2) celery, or 3) raisins.  Ants on a log snack day at school when I was young was especially awful!

I avoided chicken salad most of my life because it almost always contains at least one, if not 2, of my hated foods.  I’m also not much of a fan of mayo.  So I set out to create a chicken salad recipe several years ago that I actually liked and I have to tell you, it’s one of my favorites.  It’s not only allergy friendly, it’s very healthy too.  A perfect lunch on lettuce or sandwiches!

IMG_1333

1 large chicken breast
1/4 cup roasted almonds
1 apple (fuji, gala, whatever is on sale that isn’t too sweet or tart)
1 tbsp dijon mustard
1 tbsp vegan mayo
3-5 stalks green onion
olive oil
splash of lime juice
salt & pepper to taste

First, you’ll need to roast your chicken.  Preheat your oven to 375 and pat the chicken breast dry with a paper towel.  Coat with a thin layer of olive oil and salt and pepper on both sides.  Roast on a baking sheet for 35-40 minutes then let cool while you chop the rest of your ingredients.

IMG_1336

Chop the apple into cubes then place in a bowl and coat with a splash of lime juice to prevent browning. Chop the green onions into slivers (mainly green parts) and roughly chop the almonds.

IMG_1338

Slice the chicken breast in half lengthwise then cut into cubes.  Combine all chopped ingredients in bowl.

IMG_1340

Add the mustard, vegan mayo, and salt and pepper and mix well.

IMG_1342

Serve on a sandwich or on a salad, I like to add tomatoes and avocado to the salad as well.  This keeps really well for several days in the fridge so you can make a big batch and have it for a few days.

IMG_1348

Enjoy!

Date Night Steak

I rarely order steaks when I go out anymore because I have learned how to make such tasty ones at home.  This feels like a really fancy meal but it is easy and affordable, perfect for a date night.  It requires some attention, with timers and flipping the steak over but it isn’t hard and the results are amazing.  The great thing about this method of cooking steaks is that it makes any cut of meat taste great.  If there is a sale on meat this is, of course, best with a ribeye, strip, or filet. It is also absolutely delicious with a top sirloin or london broil if you are looking for an even more affordable meal.  New York Strip steak was on sale this week for $5/lb so I bought a 14 oz. steak for $4.38, one russet potato for 46 cents and 1 head of broccoli for 88 cents, so this entire meal with sides for 2 people only cost $5.72!  I’ll post the recipes for potatoes & broccoli separately.

Steak (Ribeye, Strip, Filet, Top Sirloin, or London Broil)
Olive Oil
Sea Salt & Cracked Pepper
Lawry’s Seasoned Salt

Set the steak on a plate about 30 minutes before you plan to cook and allow it to come to room temperature.

Preheat your oven to 500 degrees with a heavy bottom skillet inside. Make sure your oven is fairly clean or you will get a lot of smoke from remnants in the oven.

IMG_1046

While it is preheating, pat the steak dry with a paper towel.

IMG_1044

Rub a very small amount of olive oil all over the steak, then sprinkle salt, pepper, and seasoned salt on both sides of the steak.

IMG_1047

Turn a burner on your stove to high and pull the skillet out of the oven and place on the burner.  Get your timer, tongs, and potholder ready, the next 8 minutes will require your attention.  Sear the steak for  30 seconds on each side then place the skillet and steak in the oven.

IMG_1048

If the steak is about 1 inch thick, cook 3 minutes then flip the steak with tongs and cook 3 minutes on the other side for medium.  If it is thicker or you prefer a more medium well steak, cook another minute on each side.  I find that ribeyes typically need a little more time but the other cuts are almost always perfect at 3 minutes per side.  Pull the steak out and set on a plate to rest for 10 minutes or so, then serve.

IMG_1053

And there it is, a drool worthy steak that my pup begs for the entire time I am eating.  Serve this steak and you are sure to impress your dinner guest.

Why this blog exists

At the age of 27, I was sick…really sick, and after MRIs and CT scans and Ultrasounds, no one could figure out what was wrong with me.  Finally my doctor said, “I think the problem is that you’re allergic to everything, so cut different things out of your life until you feel better.”  I didn’t feel like random trial and error was the best approach so I went to a naturopathic doctor and through extensive blood tests found that I was deficient of several key vitamins and allergic to dairy, gluten, corn, eggs, and oats.  To give you some perspective: on the test they performed, a result above a 2 indicated an allergic reaction and my result on dairy was a 67!  One of my ultrasounds also found that the painful lumps in my breasts were fibrocystic tissue that is aggravated by inflammatory foods so I also began consciously cutting caffeine, soy, tomatoes, eggplant, potatoes, red meat and lunch meats containing nitrates out of my diet.

My reaction to this news was the same question everyone asks me when I tell them about my food allergies and sensitivities:  “…..so, what am I supposed to eat??  What’s left??”

At first I kept it simple, to test it out I did a lemonade fast for 10 days and then literally lived on raw fruits, raw veggies, and fish for the next month.  The change in my life was so dramatic after just a month that I was blown away.  For the first time in my life, I felt “good” and “normal”.  My whole life I had been dealing with headaches and stomach aches and what I call “foggy brain” and I didn’t really realize that it wasn’t normal!!

After a month or two though, I began to miss foods.  Even though I felt SO much better and the diet I was following was worth it, I missed things about my life before I knew about my allergies.  I LOVE to cook and plan menus and grocery shop and I missed making the things I used to make, I missed the way certain things taste, I missed the process of cooking, I missed being able to create new recipes and plan meals around my experiments.  I also discovered, through my own home testing, that a LOT of gluten-free and dairy-free foods on the market are TERRIBLE!!!  So I set out to create meals that I can eat that taste great, even to people without my diet restrictions.  This blog is where I will post those recipes and lifestyle tips and, because I know firsthand that not everyone in a household has the same strict requirements, I promise to only post recipes that are approved as delicious by both myself and one of my official non-allergy-restricted taste testers (pretty much anyone that I ever cook for since I know very few people with diet restrictions).  I hope you enjoy the recipes!